Where Did She Talk About...?

Thursday, October 4, 2012

You Can Flush Your Money Down the Drain...or You Can Flush It Yourself

Okay, the last time we met, it was October 2011 and I had just suffered a $600+ setback due to a leaking master cylinder in my brake system. After that, things were relatively smooth with the truck. No major issues, regular oil changes, and so on and so on.

Remember that time that I said there is no such thing as a simple oil change, though? Well, here we are: July 20, 2012. I go it to a local shop to get my oil changed. I go there because they offer the infamous $8.99 oil change without the bells and whistles (i.e. no multi-point inspection, no topping off of fluids, etc). I've been told the same old thing regarding Francis since having her oil changed at Goodyear that she required a lot of routine maintenance that I could not afford, so I just wanted the oil changed.

After waiting around for approximately 2.5 hours for a "simple" oil change, I am handed a bill for $16.00 (because there are $5.87 of "Misc. Charges"). And then, the guy hits me with this: "We highly recommend a coolant flush. It would take about one hour and it only costs $99.95. Whaddya say?" Well, of course, I'm just a simple lady with a simple lady mind and have no idea what a coolant flush entails or why it's necessary to have one. Enter the scare tactics: "We looked at your coolant and it's really sludgy. This could lead to a lot of problems if left untreated. You could be driving down the highway on your way home after this and BOOM! Your radiator dies or your engine goes ka-put! So, for $99.95 we can give you peace of mind, and little lady, that's not too much for peace of mind, is it?"

Okay, maybe he didn't say the last part and call me "little lady," but he was very urgent and salespitch-y. I politely decline at this point because I've already been there over 2 hours on my day off and I have tires that still need rotating and time to relax. But, I gotta tell you, he scared me a bit. I almost gave in, but I was struggling financially at the time and couldn't spend more than the $16 on the oil change.


Sidenote: Be aware of auto repair shops that offer services for little-to-no cost. They lose money on these services, but they will inevitably find something wrong with your car during the little-to-no cost service and highly recommend more services or parts. There is a place here in town that is notorious for offering "Free Brake Inspections" and then recommends almost every time that the customer have new brakes installed, even when their brakes are perfectly fine.

So, I got my tires rotated down the street for fairly cheap and then went home to do a little research. Come to find out, flushing your coolant is a very straight forward task. I did an online search to see what it all meant. This diagram shows your car's cooling system:


I also found many helpful videos on YouTube on how to do a coolant flush. Here are a few of the videos that really helped me:

Probably the most helpful of videos

These are a series of videos with step-by-step instructions that are easy to follow, although I did not use the flush kit that was recommended in here. Mainly, I used the video to get my bearings with the hoses and what-not that are under the hood. Also, I have a special place in my heart for Nathan.

You will find that I adore Scotty Kilmer. He makes everything seem so easy and I love his attitude and quirkiness. I think what I like most is that I see how he just rips hoses off and tosses things around, so I feel a little more comfortable about not screwing too much up.

So, as you can see, it required very few items and no actual tools. This was great, because I didn't have many tools at the time. Here's what I used:

  • 1 Gallon of Antifreeze/Coolant (not the 50/50 kind...it's a waste of money because you're paying for watered down coolant. You can just buy a gallon of distilled water and mix it yourself with 50% coolant and 50% water.) = $9.00
  • Prestone Super Flush = $4.00
  • Bucket or Oil Pan = $3.00
  • Funnel = $2.00
  • Distilled water = $1.00
  • Garden Hose
  • Rags
The whole thing took about 2.5 hours. It should have only take an hour or so, but I was new and timid to working under the hood. I hesitated many times and tooks breaks to go back and review the YouTube videos, as well as drink a lot of water. Messing around with your truck in the middle of a Texas summer with no shade can lead one to be ridiculously thirsty and fatigued. But I did it! I performed a coolant flush on my truck! Also, at this point, I still didn't know how to change a flat tire or even take a tire off! But, I flushed my coolant!!!!!

So, how do you tell if your coolant needs to changed and/or flushed? Well, depending on the type of coolant your car takes (this information can be found in the "Specifications" section of your vehicle's owner's manual and/or repair manual), the color of the coolant (also called "antifreeze") should either be a neon green or a neon orange. My coolant in the reservoir (the plastic container that holds the coolant when it is not being used in the radiator) was a nasty, brownish green color. It was really dark and smelled pretty bad.

This is about what my used coolant looked like.

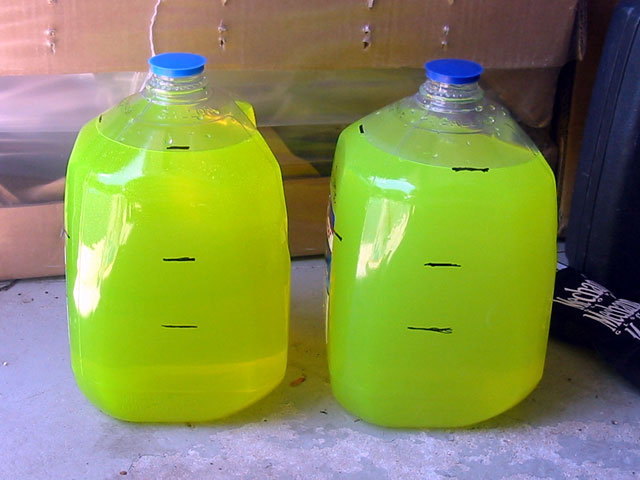
This is the color my coolant SHOULD be...and was after the flush.

Now, looking back at the videos and knowing what I know now, I think I need to re-flush my coolant. Because I was so timid and scared to start disconnecting hoses, I missed a few steps. I didn't back-flush the system. I didn't change out my thermostat like I should have. A thermostat can be found at AutoZone for as little as $4.00 and only $1.50 for the gasket. DON'T FORGET THE GASKET when replacing your thermostat. It's just a little felt gasket that seals the thermostat.

However, even with my minor mistakes, I could tell (and can still tell) a remarkable difference in Francis' performance. I think I will properly flush my coolant sometime soon and take pictures of the process for you all. It still bothers me to this day that I missed a few steps. But, this experience sure did build my confidence and it was after this that I felt I could take on most maintenance that my truck needed! 

Things to know:
  1. NEVER open a hot radiator cap. Wait for your car to cool down before messing with the radiator. A hot radiator cap could spray ridiculously hot coolant on you and cause severe burns.
  2. Keep track of any maintenance performed by you or your mechanic. It will help you figure out your maintenance schedule later on.
  3. Most of the employees at auto parts stores are very helpful and love to answer questions. Don't be afraid to ask. They are there to help you. And I'm sure they have heard crazier stories than yours.
  4. Remember to properly dispose of used coolant. It is extremely harmful to animals, people, and the environment. Put your used coolant in an empty container that is clearly marked and then take it to your local Jiffy Lube, AutoZone, or other participating shops that recycle these types of fluids. Earth911 is a great resource to find out who recycles what fluids and parts in your area.
Amount of money saved = $75

Boo-yah!


Wednesday, October 3, 2012

Screeching Halt

Picture it. Driving down the highway and a light pops up on the dash. A warning light. But, you don't know it's a warning light. You just think it's the Parking Brake light, telling you your parking brake is on. You check it and the parking brake is not engaged. You shrug it off, thinking that the light is malfunctioning and go on with your life, which entails taking your partner to work while you look for a job.


Fast forward a week or so later. The light is still on, the parking brake is still not engaged, BUT you managed to find two part time jobs. Yay! However, you are becoming annoyed that this pesky, bright, red light is interfering with your driving at night. You pull out the 'ol owner's manual and find out why the light might be on. What you thought was the Parking Brake light is, in fact, officially the Brake System Warning light, which does indicate if the parking brake is engaged, but it's never come on in the few months you have owned the truck. You read on in the owner's manual and find this is big, bold letters:

The BRAKE light indicates that the brakes may not be
working properly. Have the brakes checked immediately!


Oh boy. Kids, the brakes are nothing to fool around with. And shame on me for ignoring that light. I contact the good people at Goodyear Auto Service Center and inform them of the situation. They say to bring the truck in immediately! All I hear as I carefully drive Francis to Goodyear is money flying out of the window. I drop her off and head back home on a bus. The day is October 14, 2011. The time is 12:00 PM on the dot. I wait for the news.

James from Goodyear calls me a little later on after fully inspecting Francis. They pinpoint the problem. There is a leak that appears to be coming from the Master Cylinder and through into the Power Brake Booster. In short, brake fluid has slowly been leaking all over components in my truck. The truck was severely low in brake fluid. No brake fluid = DANGER! James has the following recommendations:

Helpful diagram that I could have used during this time
  • New Master Cylinder = $159.86 parts + $76.80 labor
  • New Power Booster = $157.90 parts + $124.80 labor
  • Brake Fluid Exchange Service = $20.95 parts + $79.00 labor
What choice do I have? I didn't know what any of this means! All I know is that brakes are vital in a car and if something is not working with the brakes, that should be fixed. And that's that. I manage to scrounge up a $50 off coupon for labor fees at Goodyear. At 6:53 PM that same day, I pick Francis up and drop $624.32, almost half of which was for labor and shop supplies cost.

Oh, and James still recommends the following for Francis:
  • Replace wiper blades = $15.50 parts + $2.24 labor = $19.98 Total
  • Repack front wheel bearings = $4.00 parts + $96.00 labor = $100 Total
  • Replace front shocks = $153.96 parts + $38.40 labor = $230.76 Total
  • Replace rear shocks = $153.96 parts + $38.40 labor = $230.76 Total
  • Replace left and right outer tie rods = $90.96 parts + $124.80 labor = 215.76 Total
  • Wheel alignment = $79.95 - $10 discount = $69.95 Total
  • Power steering fluid exchange = $40.95 parts + $49 labor = $89.95

New GRAND TOTAL for recommended services = $1022.12 (including tax)

No, thanks, James. I just dropped over $600 today. There's no way I can afford another $1000. But, thanks for trying. Good day, sir. And with that, we were gone. Never to be heard from again. Until the next blog, which I promise will start to get into the actual fun stuff.


Thursday, September 20, 2012

Teaser

15 minute DIY job yesterday that saved me over $300. More on this later. I'm trying to stay in chronological order. You're welcome.


Wednesday, September 19, 2012

Nothing Routine About Oil Changes

I want to start off this post by saying that until several weeks ago, I didn't even know how to change a flat tire! I'm serious! And I didn't own many tools. Just a few tools my dad gave me and a few I bought along the way. Nothing crazy. Mainly for home improvement jobs, like hanging pictures and shelves.

So, what brought on my change of heart? What captured my fascination and frugality? It took a few oil changes and bad news/recommended maintenance for Francis to do it. First instance. Picture it: Sunny August day (the 26th, to be exact) in 2011. We've only been in Austin a few weeks. My partner has a job and I am furiously looking for one. My savings account is quickly dwindling to nothing. And now I need an oil change. I mean...we did just drive over 2500 miles (with no air conditioning through Tuscon, Arizona, I might add). So, I took it to Goodyear Auto Service Center for a routine oil change.

Kids, there is nothing routine about an oil change. Especially on a 1996 Ford Ranger with 197906 miles on it. First off, it took forever!!! Luckily, I didn't have a job, so no problem. I had all the time in the world!! I got there at 9:40 AM and left at 11:30 AM. Almost two hours, watching the Discovery channel while strange men in jumpers poked, prodded, and drained my sweet little Francis. After two hours, the auto technician, James, comes out and says there are a few recommendations. Here's the breakdown of his list:
  • Wiper blades
  • Wheel bearing repack
  • Front and Rear shocks
  • Outer tie rod ends w/alignment
  • Power steering fluid exchange
  • Brake fluid exchange
I am just a lady with a simple lady mind. I had no idea what language he was speaking or what this all meant. But, I asked James for a few price quotes, just for funsies. Here was his breakdown:
  • Wiper blades = $20 + tax
  • Wheel bearing repack = $100 + tax
  • Front and rear shocks = $460.76 + $95.71 recommended alignment + tax = $602.00
  • Outer tie rod ends = $310.71 + tax
  • Power steering and brake fluid exchange = $200
He said he could do it all for $1133.80, which included a small discount for getting everything done in one fail swoop. After apologizing for my guffaw, I politely declined and explained that I just moved to town and don't have a job yet to help pay for these costs. I asked if there was anything super serious for me to have done. He recommended a power steering fluid exchange (Ford Rangers are notorious for power steering issues, apparently) and brake fluid exchange. Again, I declined and paid the man for his services. Total cost of the oil change that day was $24.27 (with coupon). By declining his recommendations, I saved myself $1109.53, but paid greatly in my worry that my truck was on it's way to the junk yard and that I had purchased a dud in Seattle.

And then, as VH-1 "Behind the Music" programs usually go, disaster struck. But more on that in my next post. It's 10:00 PM and I have to be to work by 6:00 AM tomorrow. So, I must wish you a good night and happy mechanic-ing!


Monday, September 17, 2012

Training Wheels

How do you begin a blog post? Your first blog post on a fresh blog? Well, I guess we should start at the very beginning. It's a very good place to start. I own a 1996 Ford Ranger Super Cab 3.0L V6 Rear-wheel drive.This truck currently has over 210,000 miles on it. With this truck's age and mileage comes great responsibility.

In July 2011, we sold our 1985 Volvo 240 GL ("Nellie") for $800 and bought this truck (recently named "Francis") for $1400. No frills. No A/C. Just a truck with a camper shell that would take our family and our possessions from Seattle to Austin. From the get-go, Francis gave us problems. I took her to get inspected on July 20,2011 so I could change the title to my name and she failed! Fail codes:

P0125 - Insufficient Coolant Temperature for Closed Loop Fuel Control
P0401 - Exhaust Gas Recirculation (EGR) Flow Insufficient Detected

Great. Just great. My partner took it to Affordable Tire & Brake in Seattle, and dropped $153.25 for a diagnostic test. The EGR Valve tested good with good flow. The EGR solenoid failed, as did the temperature sensor. They recommended at a new EGR solenoid and a new thermostat. The mechanic also recommended a new drag links (aka inner tie rods), oil change, air filter, and alignment. We knew the alignment was bad taking the truck to the shop, but we had no idea it would be something as major as a drag link replacement. Perfect.

I wanted a second opinion. My partner took the truck to Les Schwab Tires. Sure enough, the truck needed the drag links replaced. Luckily, the EGR thing was a quick fix that they did for free. We also would need two new tires on the back to get us to Texas. They quoted $300 for the drag link replacement and another $300 for new tires, balance, and alignment. 

I used a life line and phoned a friend. My partner's friend, Ben, is pretty good with auto repair. He said we could change the oil and thermostat ourselves. He said he wouldn't mind helping with the drag link replacement, either, because it would be fun to learn. I chickened out of it. I was not feeling adventurous and was happy enough to just learn to change the oil and thermostat on the truck. Looking back, and knowing what I know now, a inner tie rod replacement is not that big of a deal and I could have done it for much cheaper than what we were charged at Les Schwab, but what are ya gonna do?

We forked over $601.52 to Les Schwab. It was painful, but the truck only cost $1400 (talked down from $2000) and we were planning on driving the truck from Seattle to Austin, so well worth it.

A few days before Les Schwab, I went to NAPA Auto Parts (my first trip ever) and bought a thermostat ($5.55), thermostat gasket ($0.65), oil filter ($3.29), 5 gallons of 10w30 motor oil ($20.45), and an air filter ($10.49). We took the truck to a home garage that belonged to Ben's friend to learn how to change our oil, air filter, and thermostat. I think it was here that slightly sparked my interest in mechanics. We got dirty. We learned new things. We worked with our hands on our own truck! It was a blast! And we saved money doing it ourselves! Total cost was $44.27, whereas I believe we were quoted almost $80 or so to have this all professionally done. And when you're planning a move to Austin, every penny saved counts!

We arrived safe and sound (and slightly overheated--not the truck, just our family) in Austin on August 2011. Since then, the truck has taken us through many highs and lows. As mentioned earlier, with an old truck comes great responsibility...and when you have very little money to spend on taking your truck to the shop every time it sneezes or hiccups, you learn that you are capable of more than ever thought possible.


Within the past few months, I have successfully completed several D-I-Y repairs and maintenance on little Francis. I started posting updates and pictures on Facebook. A friend of mine mentioned I should start blogging about it. Her partner thought up the title for the blog. With such a clever blog title, I HAD to start a blog. So, I hope you enjoy my adventures. I'll post D-I-Y adventures past and adventures present. Thanks for reading. And thanks for your encouragement as I continue this amazing journey!